


Table of contents
In this lesson, we will learn how to delete a contact from the database. We will add a delete button to the Contact View page and setup the button to dispatch an API request to the backend when clicked, which will result in the contact being deleted.
Fortunately 😉 or unfortunately 😩, this will be the last lesson for this series. It has been a long ride which has resulted in me creating one of longest web development series on the internet (and I never set out to write such a long series). There will be more advanced topic which will be derived from this projects in the nearest future.
Let's create a new branch of our project:
# Make sure you are within your project
git checkout -b 21-deleting-a-contact
Frontend Modifications
Beginning from the frontend, we will make use of Quasar's Dialog plugin to display a confirmation dialog before a user deletes a contact. Let's install that plugin into our app.
Open the ui/quasar.conf.js file. Refer to this snapshot of the file.
Make the following changes in the framework > plugins array. We are simply adding the Dialog plugin into our Quasar build. You don't need to install any external dependencies for this:
-    plugins: ["Notify"],
+    plugins: ["Notify", "Dialog"],
Next, open the ui/src/boot/axios.ts file. Remove the console.log calls at Line 26 and 28.
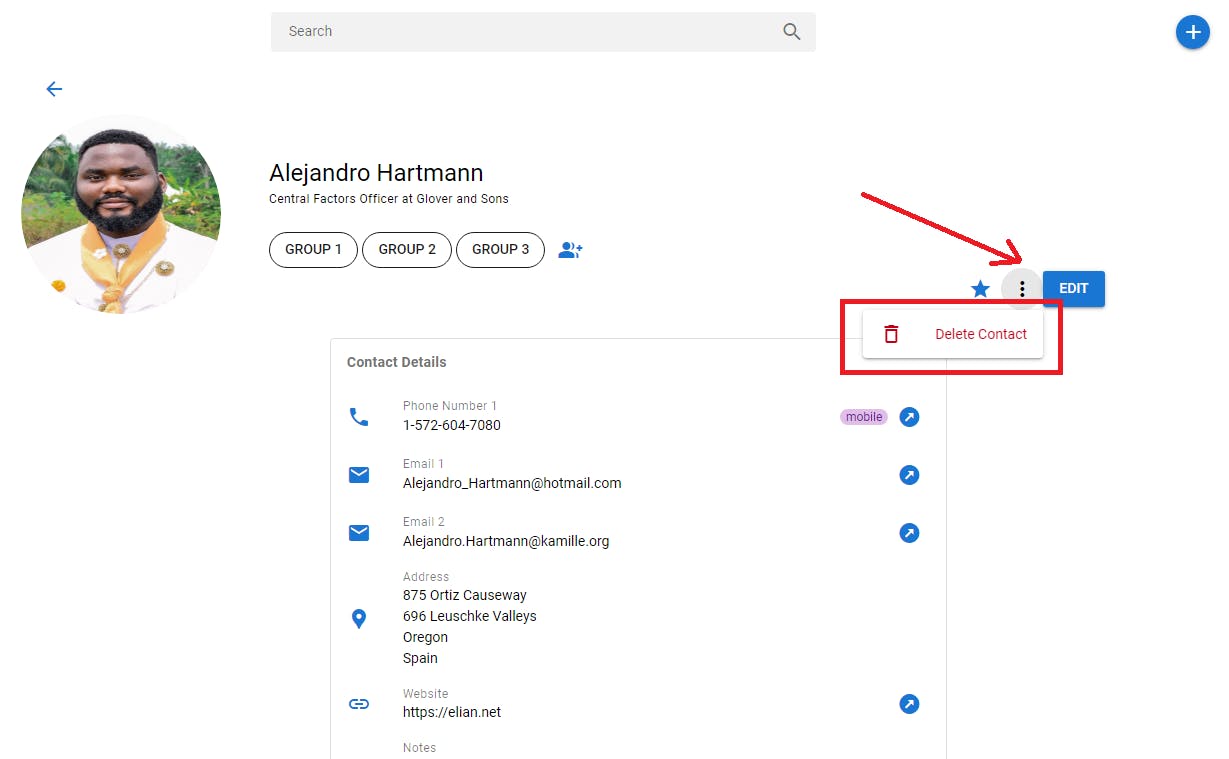
Next, open the ui/src/pages/contacts/ViewContact.vue file. Refer to this snapshot of the file. From 78 to 94, we add a QBtn component which will enable us to click and delete a contact.
            <q-btn flat round ripple icon="more_vert" class="q-mr-1">
              <q-menu anchor="bottom end" self="top end">
                <q-list class="text-grey-8" style="min-width: 100px">
                  <q-item
                    v-close-popup
                    clickable
                    class="text-negative"
                    @click="confirmDeletion"
                  >
                    <q-item-section avatar>
                      <q-icon name="delete_outline" />
                    </q-item-section>
                    <q-item-section>Delete Contact</q-item-section>
                  </q-item>
                </q-list>
              </q-menu>
            </q-btn>
Within the QBtn component, we add a QMenu component for display a menu which contains QList component which finally renders the QItem component which hosts the deletion functionality. We attach a click event listener to the QItem component and assign the confirmDeletion function as the click event handler. The confirmDeletion function triggers a confirmation dialog asking the user to confirm the delete operation.
In the script section, at Line 246 and 247, we import useQuasar composable from quasar and useRouter composable from vue-router.
In the setup function, at Lines 262 and 263, we execute the composables to create the $q and router objects.
From Lines 365 to 378, we define the deleteContact function which is executed when the user confirms the delete operate on the QDialog component.
    const deleteContact = async function () {
      await store
        .dispatch("contacts/DELETE_CONTACT", props.contactId)
        .then(() => {
          $q.notify({
            message: "Contact deleted",
            type: "positive",
          });

          void router.push({
            name: "home",
          });
        });
    };
The deleteContact function dispatches the contacts/DELETE_CONTACT store action which sends an API request to the backend. When the API request is successful, the user will be notified through the Quasar Notify plugin via the call $q.notify(). After deletion, the user will be navigated to the home route via the call:
          void router.push({
            name: "home",
          });
At Lines 380 to 400, we define the confirmDeletion function. This function calls creates a Quasar dialog box via the call $q.dialog(). The $q.dialog() function takes an object which customising the content of the dialog and styles of the buttons.
      $q.dialog({
        title: "Confirm",
        message: "Please confirm this deletion?",
        // customises the style of the `cancel` button
        cancel: {
          textColor: "green-6",
          flat: true,
        },
        // customises the style of the `ok` button
        ok: { textColor: "red-6", flat: true },
        persistent: true,
      })
When the user clicks the ok button, the action is confirmed and the deleteContact function is called:
        .onOk(async () => {
          await deleteContact();
        })
If cancelled, the user is alerted that the contact was not deleted:
        .onCancel(() => {
          $q.notify({
            message: "Contact not deleted",
            type: "positive",
          });
Next, we improve the Vuex store's contact module and introduce the DELETE_CONTACT action.
Open the ui/src/store/contacts/actions.ts file. Refer to this snapshot of the file. We remove the console.log at Line 60. Then, at Line 89 to 99, we add the DELETE_CONTACT store action:
  DELETE_CONTACT(ctx, contactId: string): Promise<string> {
    return new Promise(async (resolve, reject) => {
      await api
        .delete(`/contacts/${contactId}`)
        .then((response: HttpResponse) => {
          const deletedContactId = response.data.data as Contact["id"];
          return resolve(deletedContactId);
        })
        .catch((error) => reject(error));
    });
  },
The action makes the DELETE /contacts/:id API call and requests for the provided contact to be deleted.
Lastly, we clean up the ui/src/store/index.ts file. Refer this snapshot for the updated file.
Backend Implementations
There are no backend changes as we already implemented the destroy method in the ContactsController to handle the deletion of the requested contact. See here.
Now save all files and serve both the fronend and API server.
# Serve the frontend
cd ui
yarn serve

# Split the terminal and serve the backend
cd api
yarn serve
On the Contacts table (homepage), click a contact to open the Contact View page. Then click the menu button at the top-right side of the page. When you click the Delete Contact button on the menu, you will be asked to confirm the deletion. On confirmation, the contact will be deleted.
If you have followed this series to the point, congratulations!!
That is the end of the lesson and this series. Save all files and commit the changes.
git add .
git commit -m "feat: implement contact deletion"
git push origin 21-deleting-a-contact
git checkout master
git merge master 21-deleting-a-contact
git push origin master