


Creating a Middleware and Updating a Contact | Full-Stack Google Contacts Clone with AdonisJS (Node.js) and Quasar Framework (Vue.js)


In the previous lesson, we learnt how to validate and sanitise our contact data before persisting the data to the database. In this lesson, we will learn how to update a contact and also how to create and configure a middleware in AdonisJS.
Let's start by creating a new branch for our repo:
# Make sure you are within your project
git checkout -b 14-creating-middlewares-and-updating-a-contact
Let's start by creating the route for the contact update request. Open the api/start/routes.ts file. Add the line below to the end of the file:
Route.put('/contacts/:id', 'ContactsController.update')
Here we are using the Route.put() method which corresponds with the HTTP PUT verb to define the route. The PUT verb is used when you want to completely override the properties of a resource. This is what we intend to do. It is a bit different from the PATCH verb which is used to modify just one property of a resource. Let me explain this better.
Consider this JSON which was used to create a contact in the previous lesson:
{
    "firstName": "Zechariah",
    "surname": "Pollak",
    "company": "Welch, Littel and Rowe",
    "jobTitle": "Account Executive",
    "email1": "zpollak1@blogtalkradio.com",
    "email2": "zpollak1@flickr.com",
    "phoneNumber1": "+66 (700) 444-4282",
    "phoneNumber2": "+237 (446) 364-2728",
    "country": "Thailand",
    "streetAddressLine1": "10327 Pond Pass",
    "streetAddressLine2": "1209 Vermont Drive",
    "city": "Trang",
    "state": null,
    "birthday": "1963-10-15",
    "website": "http://indiegogo.com",
    "notes": null
  }
if we want to modify the contact with the PUT method, we have to supply the entire JSON in the body of the update request. If we omit any property, it will be undefined and will persisted into the column as null. So, if we want to change the surname to Jamie; country to Germany, and jobTitle to Chief Security Officer, we have send the JSON below as payload:
{
    "firstName": "Zechariah",
    "surname": "Jamie",
    "company": "Welch, Littel and Rowe",
    "jobTitle": "Chief Security Officer",
    "email1": "zpollak1@blogtalkradio.com",
    "email2": "zpollak1@flickr.com",
    "phoneNumber1": "+66 (700) 444-4282",
    "phoneNumber2": "+237 (446) 364-2728",
    "country": "Germany",
    "streetAddressLine1": "10327 Pond Pass",
    "streetAddressLine2": "1209 Vermont Drive",
    "city": "Trang",
    "state": null,
    "birthday": "1963-10-15",
    "website": "http://indiegogo.com",
    "notes": null
  }
But why do we have to send the entire properties of the contacts just to update three (3) properties? Well, you might not agree with me but this is a practical answer: delivering all the properties mimics how an edit form works in a real application. If you check the ui/src/pages/contacts/EditContact.vue file and edit a contact from the frontend, you will see that the all the properties of the edited contact are logged to the browser console when you submit. On the frontend, resources edit forms are usually designed by populating all the existing data as a reference. Then the user can update the necessary fields and send the changed fields together with the unchanged one back to the server for persistence.
So, what if you want to edit only one property at a time? In that case, you have to define a separate route with a PATCH verb. The route might look like this:
Route.patch('/contacts/:id', 'ContactsController.partialUpdate')
And the JSON payload might look like this:
{
   "surname": "Jamie",
}
Then, the partialUpdate method will be programmed to only update the single property delivered in the JSON.
Back to our route definition for contact update:
Route.put('/contacts/:id', 'ContactsController.update')
The path of the route, /contacts/:id contains a route parameter named as id. A route parameter is used to dynamically match routes and extract parameters from URLs. For example, when we want to update the contact we created in the previous lesson, we will send this request: PUT /contacts/ckut90fru00013cvohnixd4g0. AdonisJS will compare the verb (PUT) and the path (/contacts/ckut90fru00013cvohnixd4g0) with the route definitions in the routes.ts file. And then match it with route definition Route.put('/contacts/:id', 'ContactsController.update'). After doing this, it will store ckut90fru00013cvohnixd4g0 in the params object as {id: "ckut90fru00013cvohnixd4g0"}. The params object will then be accessible within the context object throughout the lifecycle of that request. More about this latter. Read more about route parameters in AdonisJS.
Continuing with the request lifecycle. When we send the request PUT /contacts/ckut90fru00013cvohnixd4g0 and the path is matched with the route definition above, AdonisJS will internally instantiate the ContactsControllerclass and call theupdateinstance method. Theupdatemethod will receive thecontextobject. Thecontextobject contains theparamsobject. Thecontext` object will look like this:
const context = {
   params: {
      id: "ckut90fru00013cvohnixd4g0"
   },
   request: {
      body: function(){
         return {
           // Unsanitised JSON payload
         }
      }
   },
   response: {//}
}
We can access the id URL parameter via context.params.id and use it to fetch the requested contact from the database.
In this future when we want to fetch a contact and delete a contact, we will define the following routes:
Route.get('/contacts/:id', 'ContactsController.show') # For fetching the properties of a contact

Route.delete('/contacts/:id', 'ContactsController.destroy') # For deleting a contact
Again, within the show and destroy methods, we will have to repeat the same process of fetch the id parameter from context.params.id and then lookup the database to get the requested contact before we carry on with the intending operations. This is repetitive. So, what do we do? We need to extract the process of getting the id parameter and fetching the requested contact from the database into a separate file. We also need to share the file with all our put, get and delete routes. That file we will extract is called a middleware. Middlewares are used to perform repetitive tasks which can be shared across multiple routes. A middleware can also be used to fetch and inject additional data into our context object and have those data available throughout the request lifecycle. This is what we will do now.
Creating a Middleware
AdonisJS has a command for creating middlewares. Run the command below:
node ace make:middleware FindContact
This command will create a new middleware file under api/app/Middleware/FindContact.ts. We need to configure the AdonisJS application to recognise the middleware file. Open api/start/kernel.ts. Add the new middleware to the Server.middleware.registerNamed function. Refer to this snaphot file. Save the file.
- Server.middleware.registerNamed({})
+ Server.middleware.registerNamed({ findContact: () => import('App/Middleware/FindContact') })
We have just created a named middleware. This means that we have to always explicitly call it with the name findContact before it is loaded. There is another type of middleware called global middleware. Global middleware are automatically loaded during application startup and are available during any request. Read more about middlewares in AdonisJS.
Open the file, then copy-and-paste the content of this snapshot file into the api/app/Middleware/FindContact.ts file. Let's discuss what's going on within the middleware file. The content of the middleware file is shown below:
import Contact from 'App/Models/Contact'
import { HttpContextContract } from '@ioc:Adonis/Core/HttpContext'

export default class FindContact {
  public async handle(ctx: HttpContextContract, next: () => Promise<void>) {
    // code for middleware goes here. ABOVE THE NEXT CALL
    const { response, params } = ctx
    const { id } = params

    if (!id) {
      return response.badRequest({ message: 'Contact ID not provided' })
    }

    const contact = await Contact.findOrFail(id)
    if (!contact) {
      return response.notFound({ message: 'Unknown contact was requested' })
    }

    ctx.requestedContact = contact

    await next()
  }
}
We start by importing the Contact model and the HttpContextContract interface for type checking. A middleware class must have a handle method which is the entry point into the middleware. The context object is passed into the handle method as the first argument while a next() function is passed in as the second argument. Since a middleware is executed after the route definition is called and before the controller method is called, the next() function is used to advance or go to the next available middleware or if there is no other middleware, the controller method will be called. Therefore, calling the next() function after all the operations within the handle method is very important. Else, the request lifecycle will be stalled/stopped.
We destructure the context (ctx) object to get the response and params objects. The request object is not needed in the middleware so we don't extract it from the context object. Then, we destructure the params object to get the id property. If the id is not found, we return a 400 (bad request) error. We use the findOrFail static method to fetch the requested contact from the database and store it in the contact constant. Before calling the next() function, we assign the contact object to the ctx object through the requestedContact property. By doing this, when the request arrives the ContactsController.update method, the requestedContact will be available in the context object and can be destructured from there. Finally, we call the next() function. Since next() returns a promise, we have to await it.
Save the api/app/Middleware/FindContact.ts middleware file.
You will definitely get type errors when you assign requestedContact to the ctx object. Obviously, requestedContact is our custom property which is known defined in the HttpContextContract interface. We need to make TypeScript to be aware of the requestedContact property we are not attaching to the HttpContextContract interface.
# If you are using VS Code
code api/contracts/custom-http-context.ts
If you are not using VS Code, manually create the file api/contracts/custom-http-context.ts and open it.
Paste the following into the file and save.
import Contact from 'App/Models/Contact'

declare module '@ioc:Adonis/Core/HttpContext' {
  interface HttpContextContract {
    requestedContact?: Contact
  }
}
In the above, we are making use of TypeScript's declarative merging to merge our custom interface containing the property: requestedContact?: Contact with the origin HttpContextContract interface defined by AdonisJS. Save this file. If you check the middleware file now, that type error will be gone.
Now, we will assign the middleware to our contact update route.
Route.put('/contacts/:id', 'ContactsController.update').middleware(['findContact'])
Improving the ContactValidator file
Before we go into our ContactsController, let's modify few things in our ContactValidator file to suit the update process. Open the api/app/Validators/ContactValidator.ts file. Refer to this snapshot of the file. Update Line 18 in the ContactValidator file to reflect the highlighted lines in the snapshot.
We intend to make use of the same ContactValidator class to validate our data during the update process. It will be a duplication to create another. However, we need to modify the schema definition a little bit in order to work smoothly with our update process.
For email1 property, we had the following schema definition:
...
email1: schema.string({ escape: true, trim: true }, [
      rules.email(),
      rules.unique({ table: 'contacts', column: 'email1', caseInsensitive: false }),
    ]),
...
If we keep the schema definition like this, we will get uniqueness error on the email1 field when we want to update a contact because it is merely checking to ensure that email1 defined in the JSON payload does not exist in the contacts table. We have to instruct the rules.unique method to excluded the row identified by our id from the uniqueness check. So, our email1 property now looks like this:
...
    email1: schema.string({ escape: true, trim: true }, [
      rules.email(),
      rules.unique({
        table: 'contacts',
        column: 'email1',
        caseInsensitive: true,
        whereNot: this.refs?.id ? { id: this.refs.id } : {},
      }),
    ]),
...
The difference is in the whereNot property introduced. It checks for the existence of a refs instance property defined as shown below:
  public refs = schema.refs({
    id: this.ctx.params?.id ?? null,
  })
Read more about schema refs in Schema Caching in AdonisJS. A schema refs is defined calling schema.refs() method and assigning an object containing the properties we want to cache as an argument. In the case, we are checking if the ctx.params object contains an id property. If true, we cache it in the refs property and later retrieve it as this.refs.id.
Regarding the whereNot property in the options for rules.unique, if this.refs.id exists, we will assign the constraint object {id: this.refs.id}. This means that we want to check for uniquenss of entries in the email1 column of the contacts where contacts.id is not equal to the id of the contact we are edited. This is how you exclude the a resource being edited from uniqueness validation.
Creating the ContactsController.update method
Now that we have ensured that the contact being edited will be validated, we need to work on the ContactsController.update method.
Open api/app/Controllers/Http/ContactsController.ts. Refer to this snapshot. Let's talk about what going on in the update method.
- At Line 85, do you notice the property
requestedContactwhich is destructured from thecontext object. That is the property we added to thecontextobject in theFindContactmiddleware. Because we calling the middleware in the route definition, theLucidmodel of theContactwill be looked up and stored in thecontext` object. - At Line 87, we begin by calling the
request.validatemethod and passing in theContactValidatorclass as the argument. Thevalidatemethod will return the validated and sanitised properties of the JSON data.const payload = await request.validate(ContactValidator)responseobject. - At Line 89, we destructure
payloadto get the individual properties of the payload.const { firstName, surname, company, jobTitle, email1, email2, phoneNumber1, phoneNumber2, country, streetAddressLine1, streetAddressLine2, city, postCode, state, birthday, website, notes, } = payload! - At Line 109, we merge all the properties from our payload with the existing properties of the
Lucidmodel: requestedContact. This completely overrides the properties of theContactmodel acceptid,createdAt, andupdatedAtproperties which we haven't assigned because in the contact update operation, theidwon't be update; thecreatedAtproperty is automatically when the contact is first created; and theupdatedAtproperty is automatically updated when the contact is updated. - At Lines 129-130, we call the static method:
save()to persist the changes (merged properties) to the database. Notice that thatrequestedContact.merge()method was notawaitedbecause it is a synchronous operation which does not involve the database. While therequestedContact.save()method wasawaitedbecause it is an asynchronously call to a database operation and we need to wait for the database engine to carry out the task and return the results. After this werefreshthe model before returning the response.
Updating a Contact
Now, we have everything in place to update a contact. Let's do the following:
- Open
Postman. Ensure that you are in theGoogle Contacts Cloneworkspace. - Right-click on the
CRUDcollection and clickAdd Request. EnterEdit Contactas the name. - Change the request method to
PUT. Enter{{baseURL}}/contacts/:idin theRequest URLfield. ThePath Variabletable will be displayed under theParamstab. If not show, switch to theParamstab below therequest URLmanually. We need to populate theidof the contact we want to update. - Open
MySQL Workbenchand open the connection we created for this series. Expand thegoogle_contacts_appschema, and browse thecontactstable. Copy theidof the contact withfirst_name:Zechariah. Now, switch back to
Postmanand paste theidinto theVALUEcolumn for theidparameter row. EnterContact IDunderDESCRIPTION.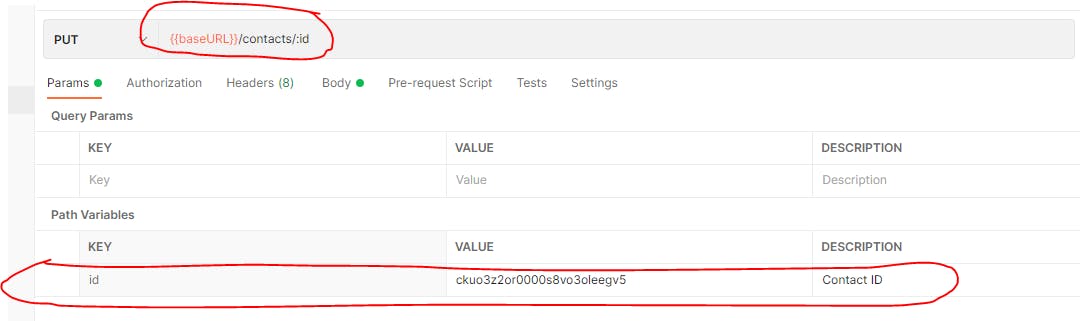
Switch to the
Bodytab. Selectrawdata type and make sure thatJSONis selected at the end of the options.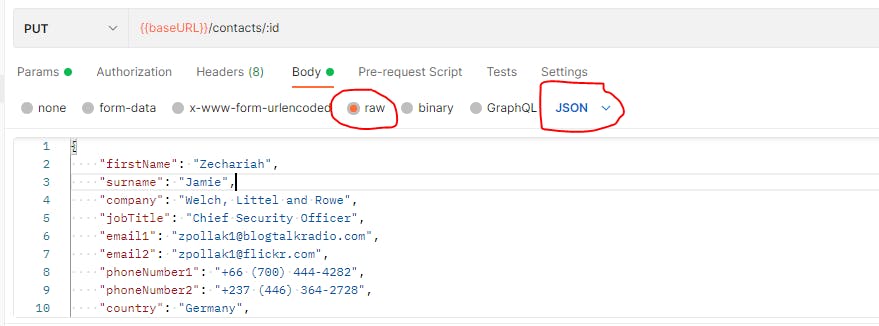
Inside the
bodyarea, copy and paste the JSON below:{ "firstName": "Zechariah", "surname": "Jamie", "company": "Welch, Littel and Rowe", "jobTitle": "Chief Security Officer", "email1": "zpollak1@blogtalkradio.com", "email2": "zpollak1@flickr.com", "phoneNumber1": "+66 (700) 444-4282", "phoneNumber2": "+237 (446) 364-2728", "country": "Germany", "streetAddressLine1": "10327 Pond Pass", "streetAddressLine2": "1209 Vermont Drive", "city": "Trang", "state": null, "birthday": "1963-10-15", "website": "http://indiegogo.com", "notes": null }Click
Beautifyat the top-right corner to format the JSON properly.Click
Sendto send the request. If everything went well, you will get the response below (we are updating thesurname,job_title, andcountryproperties):{ "message": "Contact was edited", "data": { "id": "ckut90fru00013cvohnixd4g0", "first_name": "Zechariah", "surname": "Jamie", "company": "Welch, Littel and Rowe", "job_title": "Chief Security Officer", "email1": "zpollak1@blogtalkradio.com", "email2": "zpollak1@flickr.com", "phone_number1": "+66 (700) 444-4282", "phone_number2": "+237 (446) 364-2728", "country": "Germany", "street_address_line1": "10327 Pond Pass", "street_address_line2": "1209 Vermont Drive", "city": "Trang", "post_code": null, "state": null, "birthday": "1963-10-15", "website": "http://indiegogo.com", "notes": null, "created_at": "2021-10-16T04:36:48.000+01:00", "updated_at": "2021-10-18T16:06:37.000+01:00" } }Also notice that the
surname,job_title, andcountryproperties have changed.Click the
Savebutton to save your new request.
Congratulations. You have successfully edited a contact with Postman and your API server is working.
This concludes this lesson. In the next lesson, we will learn how to fetch the properties of a contact and delete a contact as well.
Save all your files, commit and merge with the master branch.
git add .
git commit -m "feat(api): create FindContact middleware, validate, and update contact"
git push origin 14-creating-middlewares-and-updating-a-contact
git checkout master
git merge master 14-creating-middlewares-and-updating-a-contact
git push origin master